$459 lifetime
Effort vs result for NinjaTrader 8
In short: DC Effort measures the balance between effort — volume and delta — and result — how far price actually went — on every closed bar, scores four independent order-flow forces from the footprint, and boxes the recent high or low that aggressive volume kept hitting without follow-through.
Requires NinjaTrader 8 and Order Flow+ (included in a Lifetime licence). Tick Replay is not required. Windows.
 8
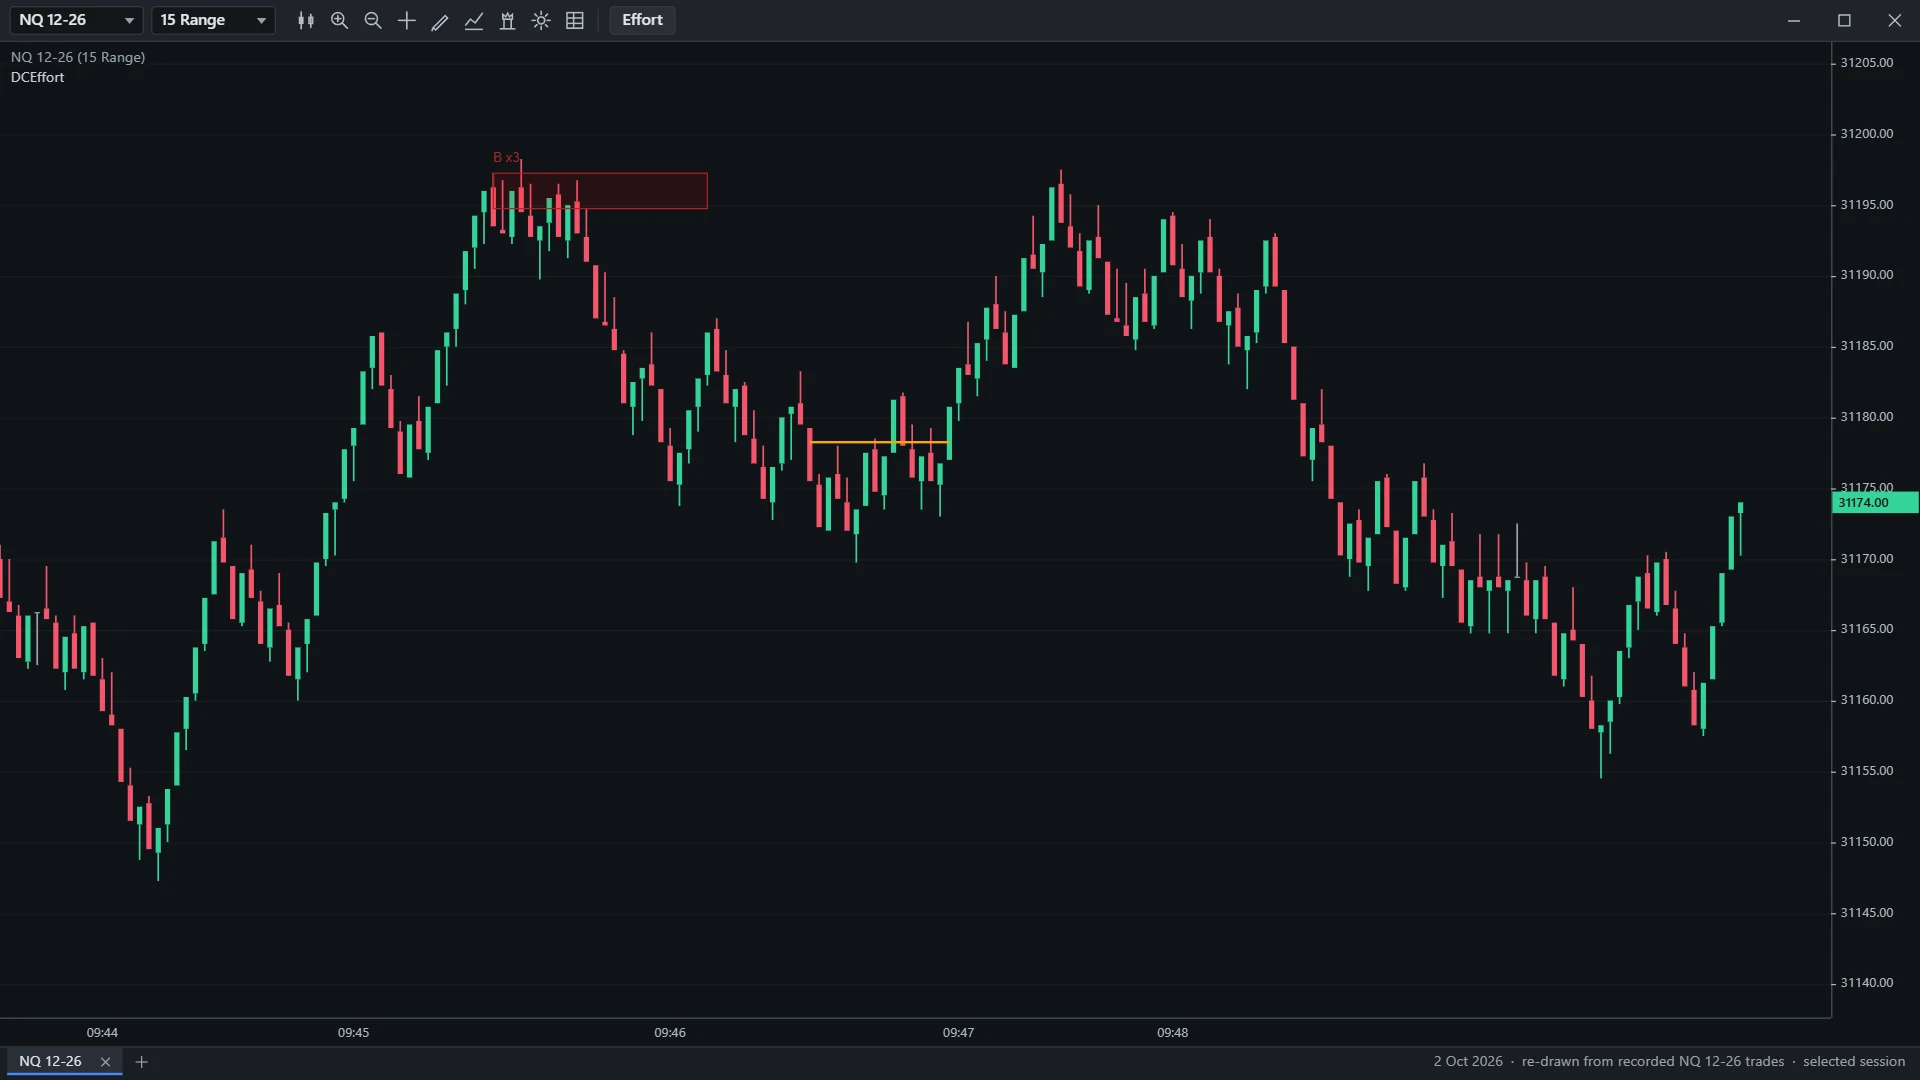
- Effort at the high, counted Five bars traded to within 4 ticks of the 50-bar high, and 153 contracts were bought at the ask in that band against 43 sold: 1.65 average bars of volume. When a bar then closed 8 ticks below it, the red box printed, labelled A x5.
- No result above it No bar closed back above the box, 31278.75 to 31281.25. By 10:33:14 price had traded down to 31225.50.
- Absorbed at one price At 31280.50 the 10:26:55 bar traded 48 contracts bought at the ask against none sold. An orange line is drawn there and runs until a whole bar trades above it; on this chart none did.
- A means four touches or more The letter counts touches, not quality: A at four or more, B below that. A box stops on a close through it or 20 bars after its last confirmation, and its price never moves.
- Effort without result DC Effort does the counting: touches and aggressive volume at the recent high and low, read from the volumetric data of each closed bar. It needs Order Flow+; Tick Replay is not required.
On recorded sessions
DC Effort on recorded NQ sessions
Moments from recorded NQ 12-26 trades, drawn by DC Effort's own rules in a NinjaTrader 8 chart window. Click a picture to see it full size.
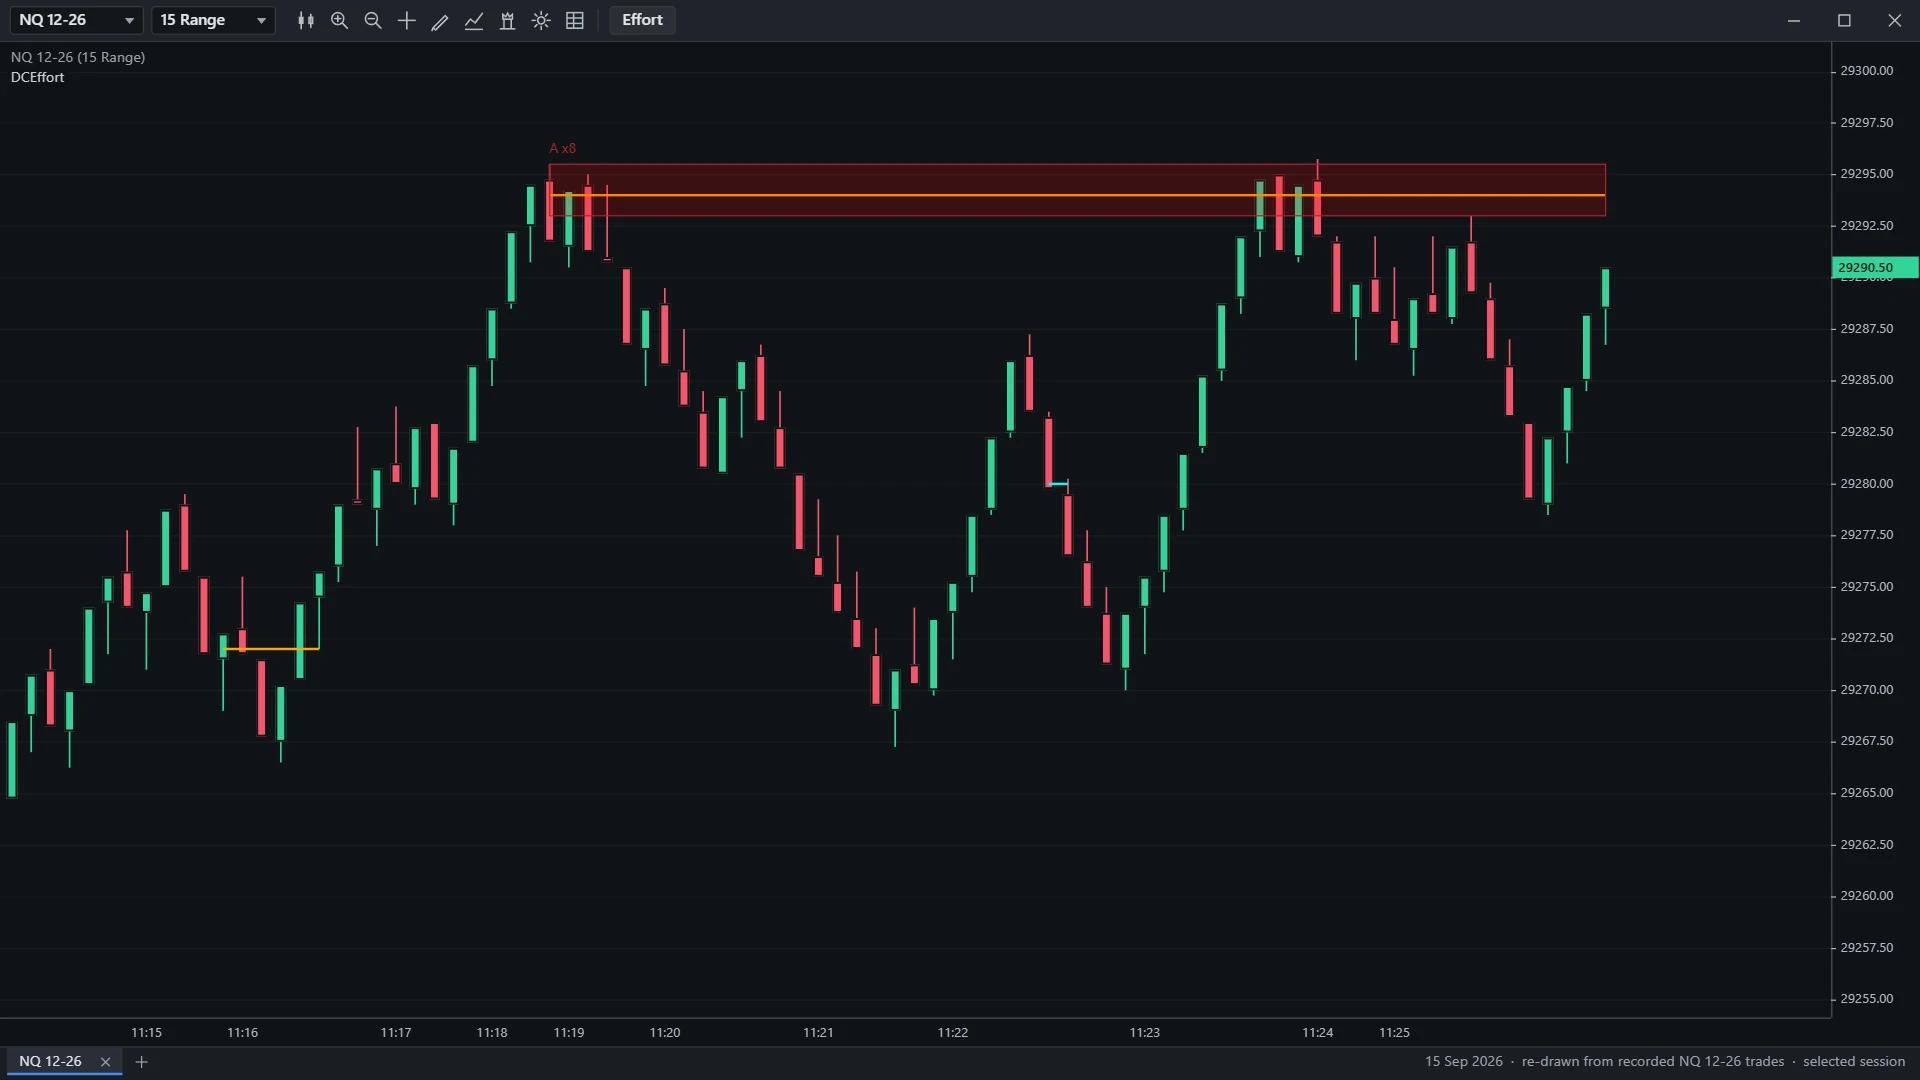
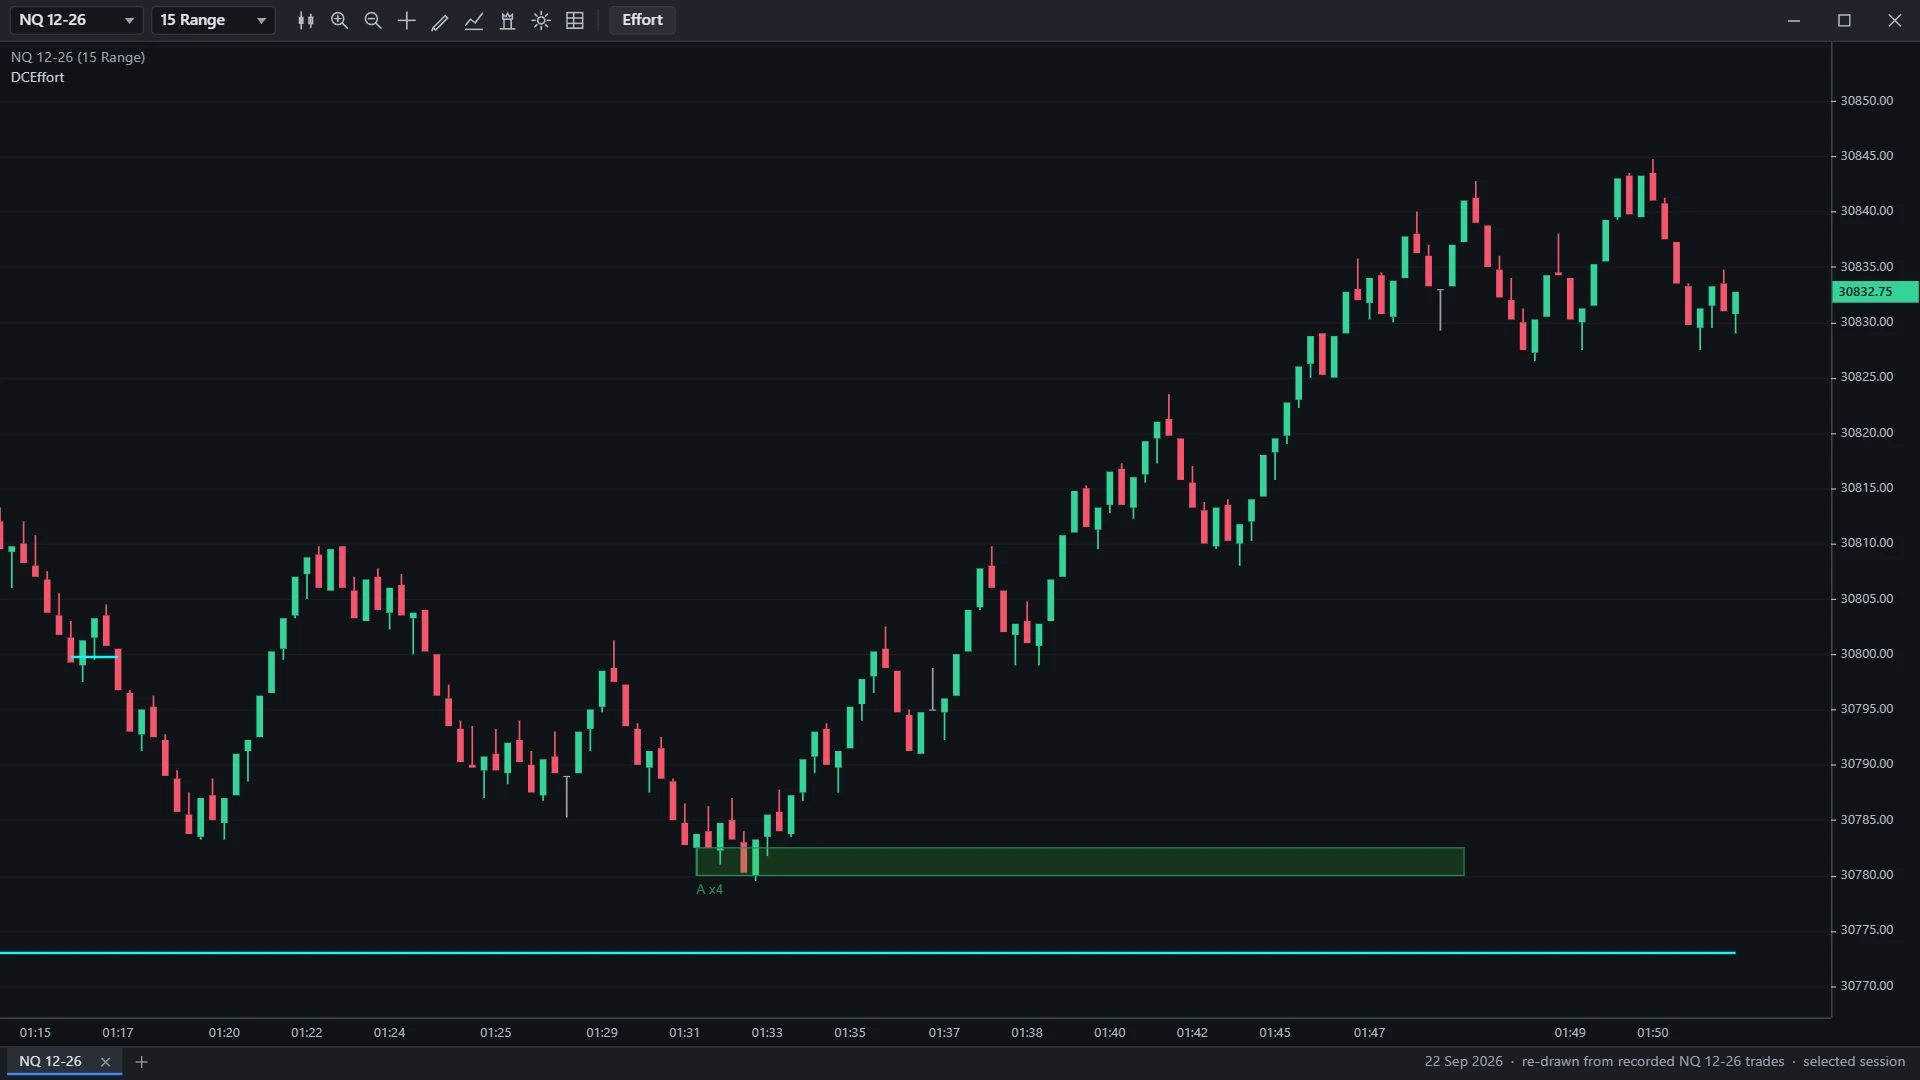
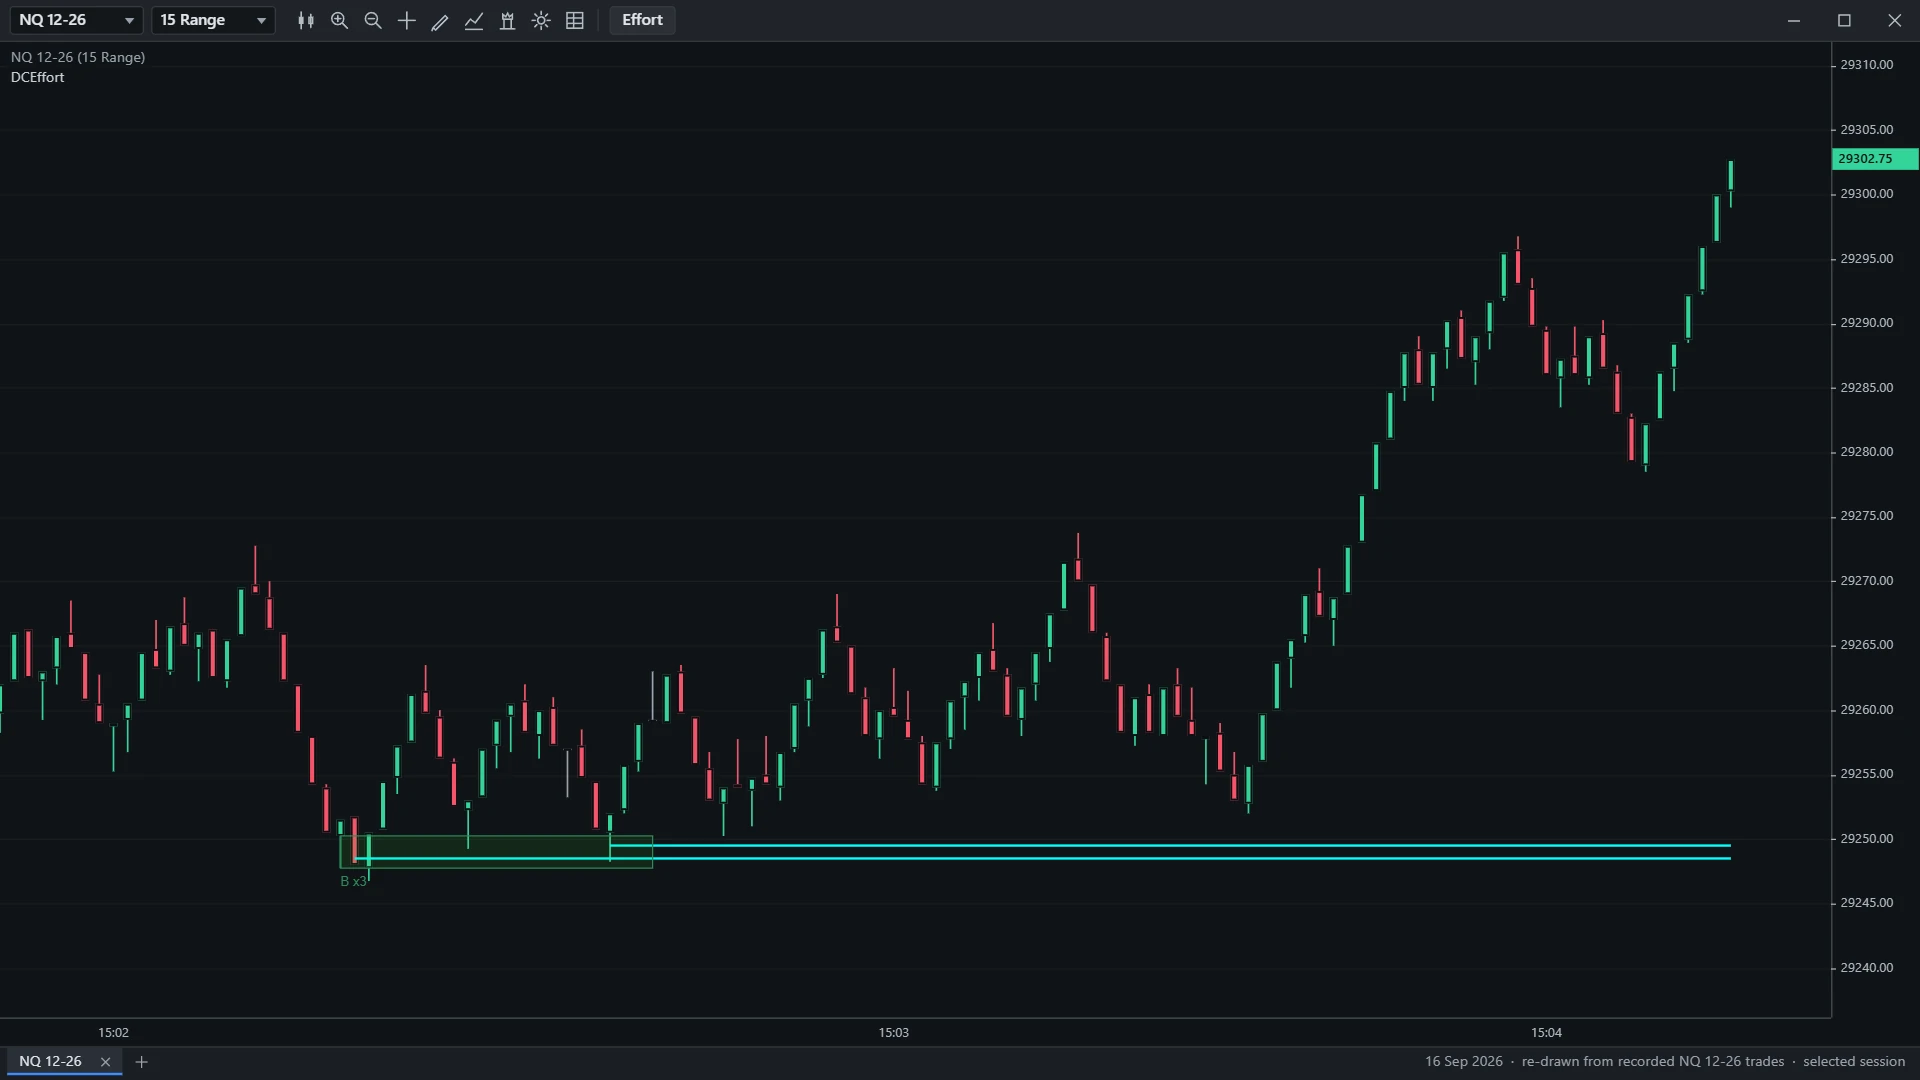
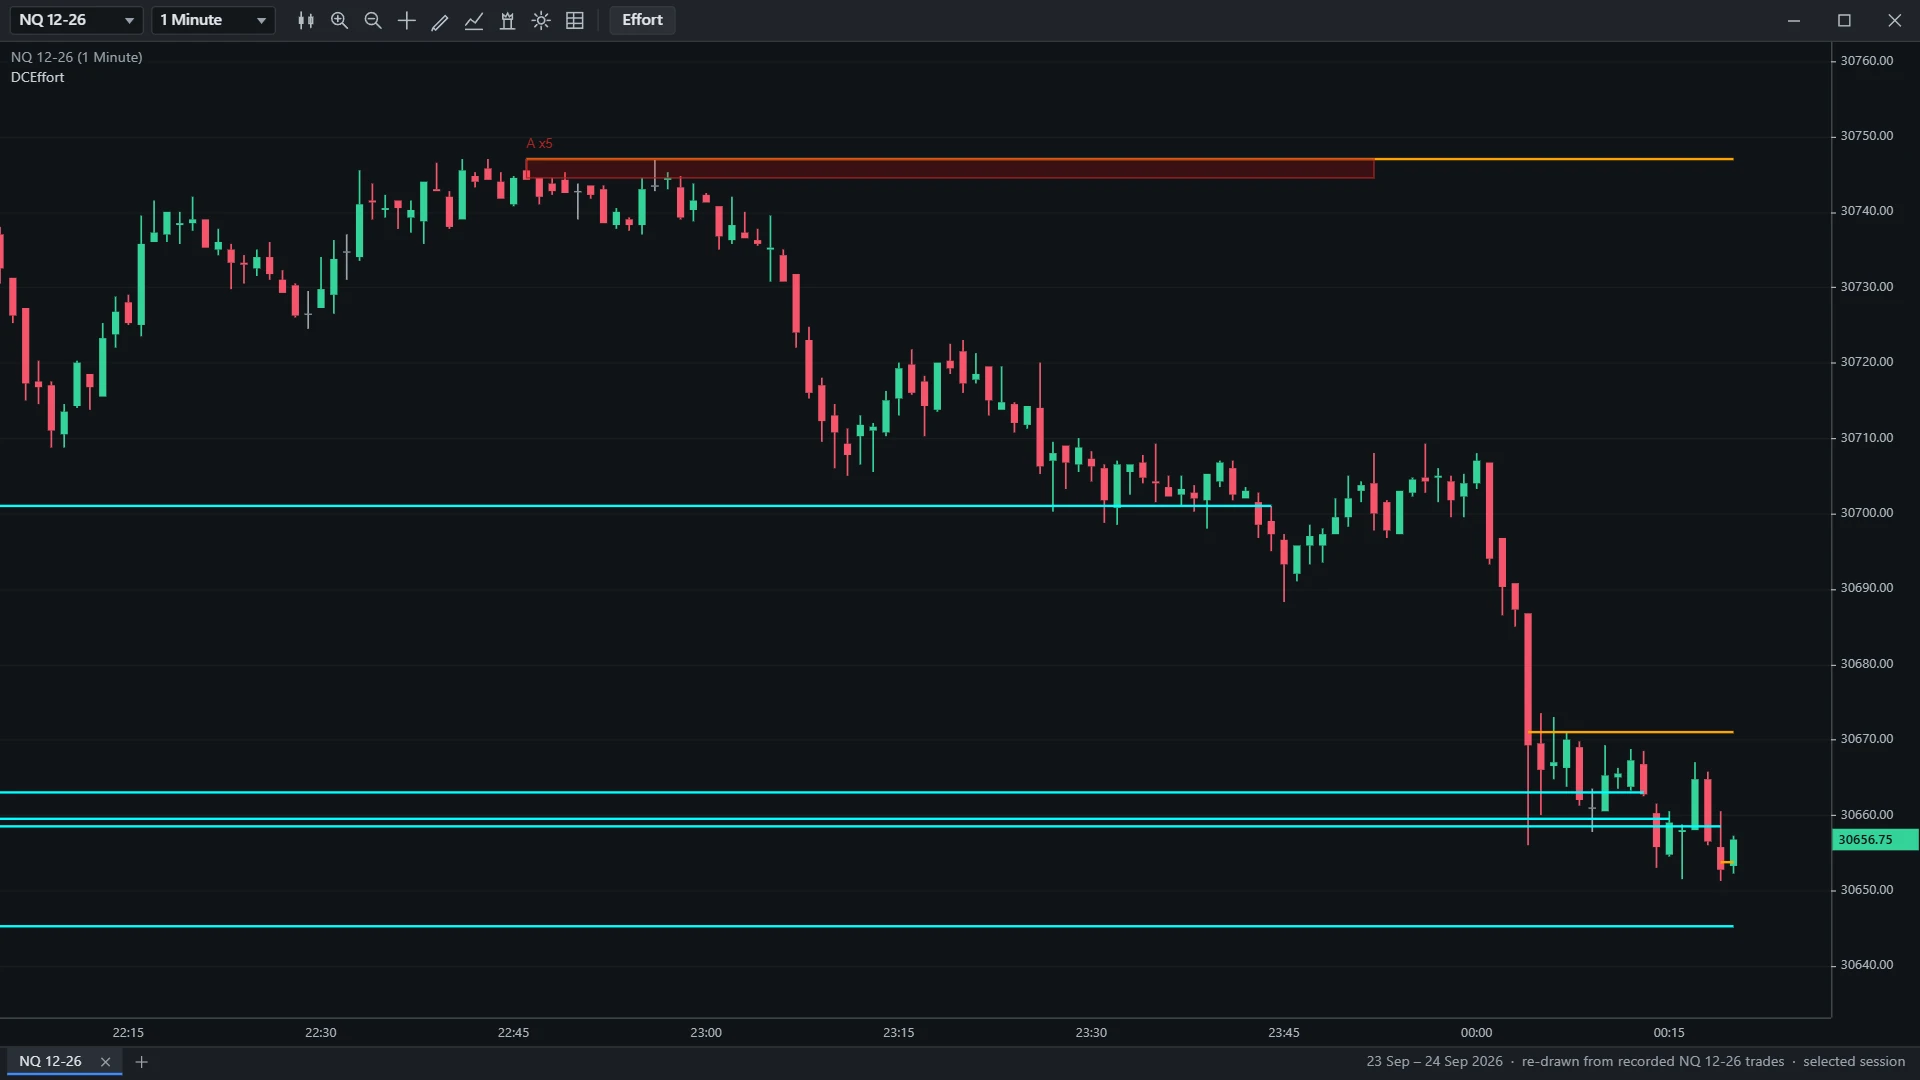
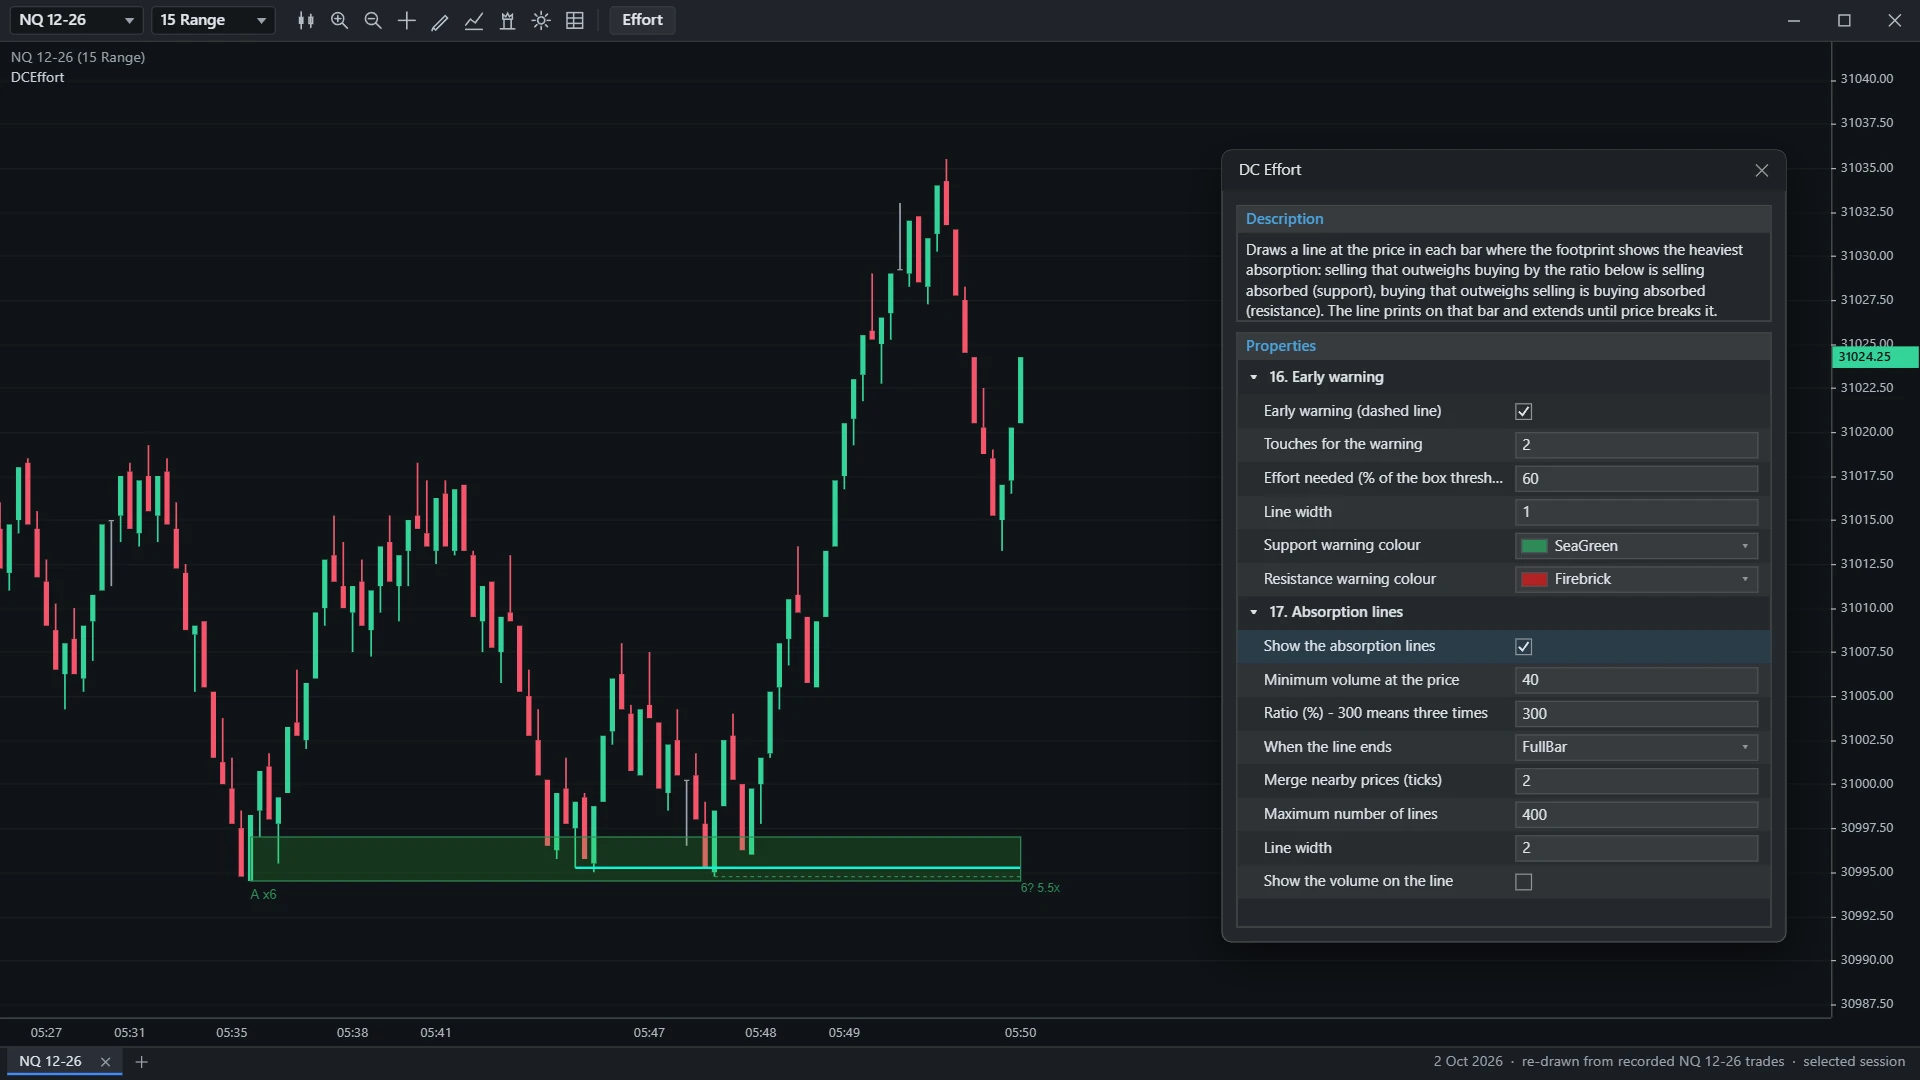
Re-drawn from recorded NQ 12-26 trades on selected sessions — illustrations, not trading results.
The problem
It is 09:47. You are two minutes into the session on NQ, one contract of your allowance already spent on a trade you should not have taken, and the footprint in front of you is doing what a footprint does.
Forty visible bars. Each one twenty-odd price levels deep. Each level two numbers. That is roughly sixteen hundred numbers on screen, refreshing, and every one of them is true.
Price stalls. A bar prints heavy volume and a fat negative delta and closes near its high — sellers hit it hard and got nothing back. Two bars later the same thing happens four ticks lower. You half notice. Three bars after that, price is back at the first level and something is holding it again, and now you are guessing whether that is the same participant defending a price or three unrelated coincidences that you are pattern-matching because you want the long.
The information you needed was on the screen the whole time. What was missing was the arithmetic: was this the same price, in the same direction, defended more than once, recently enough to still mean something? That is a counting problem, and counting is not what a human eye does well at 09:47 with money on.
DC Effort does the counting. It tells you what happened, so your decision has something to stand on.
How it works
At the close of every bar, four independent forces are computed from that bar’s footprint. Each returns a number between −1 (sellers in control) and +1 (buyers in control).
Bar delta as a share of bar volume, scaled by volume against the recent average, then multiplied by whether price actually followed the aggressors. Effort with no result does not count as aggression — it is handed to force 2.
Large delta on one side, volume at least 0.9× average, range up to twice average, and the bar closing against the aggressors. Scores for the passive side: the limit orders that ate the aggression.
Diagonal footprint imbalances — ask at a price against bid one level below, bid against ask one level above — with a bonus for consecutive runs.
Ticks travelled per contract traded, against that instrument’s recent average. Cheap movement means a thin book in that direction. Gated by a real move, so drift does not score.
Two decisions inside the arithmetic that a sceptic should check first.
The imbalance floor is adaptive. A level only counts if it clears the larger of an absolute contract count and a percentage of that bar’s volume — so the measurement behaves the same on a 25-contract bar as on a 2,000-contract bar, without you re-tuning it per session.
On an absorption bar the imbalances are turned around. They belong to the side that was absorbed, so they mark the wall, not the direction. Without that flip, force 3 contradicts force 2 on precisely the bars where absorption matters.
The score divides by the active forces, not by four. One decisive force on its own would otherwise be diluted to 0.25 and could never register. Instead there is a coverage penalty: two forces are worth less than four, but not half as much.
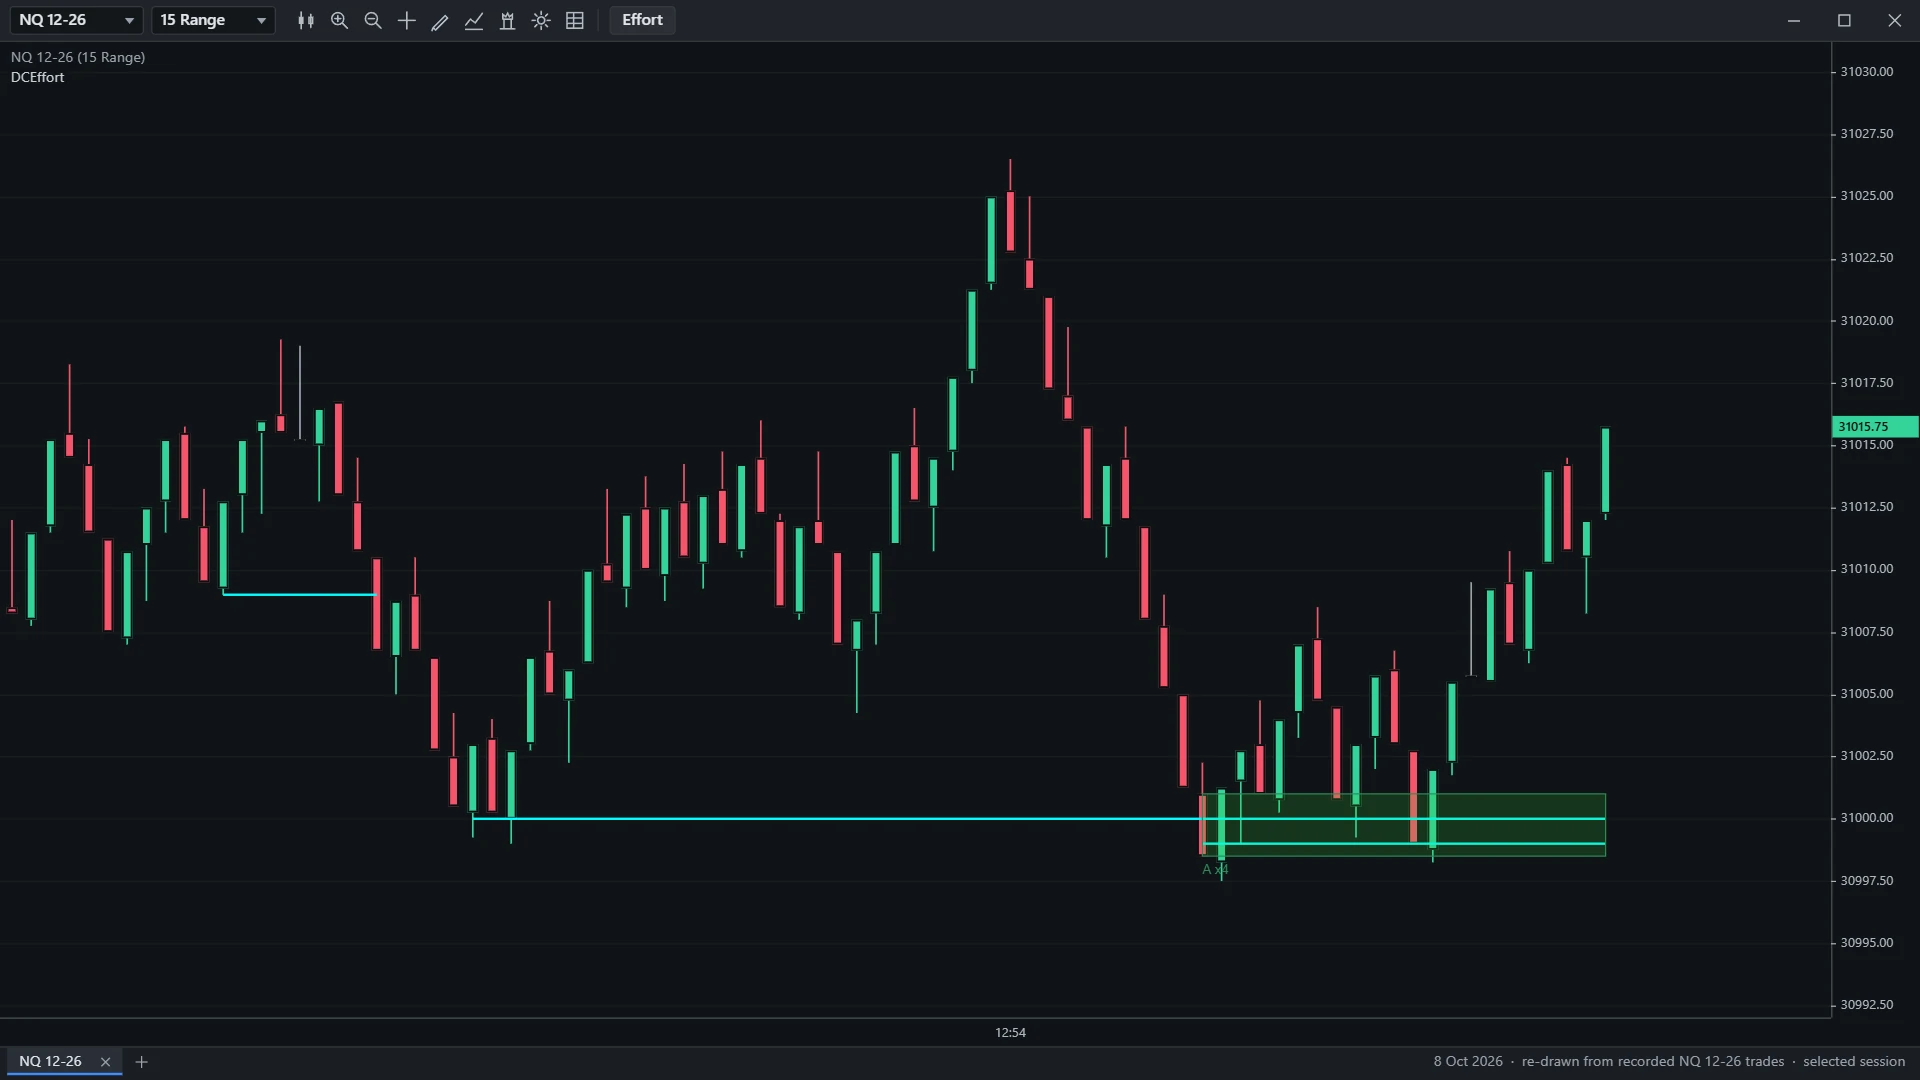
The one thing: a zone marked x3
A single absorption is common and tells you very little. The same high or low hit three or four separate times is worth counting. That repetition is the whole product.
A box prints after three touches of the 50-bar high or low, enough aggressive volume and a close 8 ticks back; A x8 = eight touches.
Why that is harder than it sounds
The obvious way to build a stack counter is to count the zones already on the chart. That implementation is silently, permanently broken, and it is worth walking through because it is exactly what you are paying to have gotten right:
Absorption #1 arrives. It counts the zones at that price: zero. Below the minimum of three, so nothing is drawn. Absorption #2 arrives at the same price. It counts the zones: still zero, because #1 was never drawn. Nothing is drawn. Absorption #3 arrives. Counts zero. Nothing is drawn. For ever.
The chart would be empty on every instrument, on every timeframe, and no setting would fix it. The customer would assume the data was wrong.
DC Effort keeps two separate lists. One holds the zones you can see. The other holds every absorption event, whether or not it became a zone — pruned on a rolling window, walked backwards from the current bar, stopping at the stack window, counting only same-direction events whose price range genuinely overlaps the candidate. That second list is the reason a stack can ever reach three. It is four lines of code, and it is the difference between a feature and a feature that works.
How the defaults were chosen
The defaults are not a guess. They were set on NQ Range 15, and the boxes come from the level settings, not the score or grade. Three of those choices are visible in the software rather than described on this page — you can check every one of them inside ten minutes of installing.
The boxes come from the 15. Level absorption settings. The four-force score runs beside them: calculated on every closed bar, shown in the panel and exposed to your strategy.
Grades to show ships set to all three, so the grade is information beside the zone rather than a gate in front of it.
It is there to be switched on deliberately, not discovered and switched off.
The level is what draws the box. A box needs three touches, enough aggressive volume and a close 8 ticks back. These defaults describe how a box is drawn, not a forecast, and every threshold is exposed so you can repeat the research on your own instrument — see Research mode below.
What you see on the chart
Everything it draws is in the table below, apart from a small licence line top left that you can hide.
| Element | What it means |
|---|---|
| Green rectangle | A buy control zone — the passive side defended this price band. Geometry is configurable: the bar range, the value area, or the control half (low to POC). |
| Red rectangle | A sell control zone, same three geometries. |
| Dashed line | Touches and effort so far at the recent high or low. On by default. |
| Aqua / orange line | One price where one side traded three times the other. On by default. |
| Grade label | A x8 — the grade and the number of touches. The count is the part that matters. |
| Stack label | x3 on its own. Drawn only when the grade label is switched off, since the grade label already carries the count. |
| Score label | The aggregate score to two decimals. Off by default. |
| Info panel, top left | All four forces live, the score, the grade, how many forces were active, how many agreed, how much they conflicted, the stack count, the direction of the day, bar volume and bar delta. |
| Fill opacity | Graded, not flat: a B zone paints at 60% of your setting, a C zone at 35%. At the default the boxes are a wash, not a block — price stays readable through them. |
| Extension to the right | A zone extends right until a bar closes beyond its protected edge — or until 20 bars have passed, whichever comes first. |
| A setup note, bottom left | Shown when Order Flow+ is not active or the chart type needs changing, and it names which of the two it is. |
Optional alert on a new zone, with a chosen .wav file. It sounds in real time while the indicator’s chart tab is the selected one.
How to use it
Reading a zone, step by step
What a zone tells you, from the setup to the next level. It illustrates what the indicator marks, not a recommendation and not a signal — DC Effort marks the level, and every decision after that is yours.
Aggressive volume kept hitting one high or low, then a bar closed well back.
A zone is a level, and a level says the most when price comes back to it, not in the bar that made it. The timing stays yours: the confirmation is whatever your own plan already uses — a rejection, a shift in the tape.
A close through the box stops it: where the read was wrong.
The next zone or level on the chart is where the move meets its next test. Where a stop, a target and the size go is a decision for your own plan and your own risk, not for the indicator.
Backtest it on your own instrument before you size up
We publish no win rate, no expectancy and no equity curve, and that is deliberate: a number produced on someone else's instrument, session and risk model tells you nothing about yours. What DC Effort gives you is a repeatable level — drawn the same way every time, on rules you can read on this page — and that is exactly the kind of thing you can test.
Run it in NinjaTrader on the instrument and session you actually trade, with your own stop and target rules, and let your own data tell you where it fits your plan. The CSV log is there so you can do that properly rather than from memory. Structure, discipline, and a rule you can repeat — that is what the indicator is for.
It is not a black box
Two things here exist because we expected to be asked to prove the numbers.
Readable directly from your own strategy, with no screen scraping and no re-implementation:
ForceAggression, ForceAbsorption, ForceImbalance, ForcePath, EffortScore, ControlDir, LastBuyBoxLow, LastSellBoxHigh, StackCount.
LastBuyBoxLow and LastSellBoxHigh give the active edges. All nine keep unlimited lookback.
One checkbox writes a semicolon-separated CSV of every bar’s raw ingredients — not just the bars that produced a zone. Test your own thresholds in Excel or Python without reloading NinjaTrader.
One thing to know: the file is opened when the indicator loads its data. Switch the setting on and then reload the indicator; without the reload no file is written.
Sixty-seven columns per bar: OHLC and range, volume, delta and delta percent, relative volume, the running averages, follow-through and close position, efficiency, POC, VAH and VAL, imbalances and stacked imbalances counted at three different ratios, all four force values, the score, the active and agreeing counts, conflict, grade, direction, EMA and session VWAP with distances in ticks, session high and low, position in the session range, and the level and absorption-line data.
Requirements
Read this table before you buy: it lists everything DC Effort needs.
| Platform | NinjaTrader 8, Windows |
|---|---|
| Order Flow+ required | Yes — it reads real bid and ask volume |
| Both calculation paths read NinjaTrader’s volumetric API, which Order Flow+ enables; a Lifetime licence includes it. Every zone comes from real bid and ask volume, never an estimate, and if Order Flow+ is not active a sentence on the chart says so. | |
| Tick Replay | Not required. What you do need is historical tick data from your data provider — set “Days to load” accordingly. |
| Chart types | Order Flow Volumetric directly, or Minute / Second / Tick / Volume / Range, where a volumetric series is added in the background automatically. |
| Instruments | Any instrument where the volumetric API returns real bid and ask volume at each price — index futures, energy, metals, treasuries, crypto futures. |
| Calculation | On bar close. Nothing is evaluated inside a forming bar. |
| Settings | 98 settings across 17 sections plus Licence, reachable from a single toolbar button. Detection edits apply from the next bar. |
| Price | $459 one-time, lifetime updates |
What it pairs with
If you already own DC Absorption Levels, here is the distinction in one sentence.
DC Absorption Levels keeps the heaviest single-price absorptions; DC Effort counts touches at the recent high or low and boxes the level.
One gives you a map of the heaviest walls in the recent past, and you decide which ones matter. The other boxes a high or low only after three touches, and hands you a count instead of a judgement. Traders who run both use the map for context and the zone for attention. Traders who run one usually pick by temperament: Absorption Levels if you want to see everything, DC Effort if your problem is that you see too much.
Both are part of the order flow suite, and both are included in the founder bundle.
DC Effort — $459
One payment, licensed for life, updates included — three machines, per person. Delivered the moment you pay: a portal account and a licence key. Stripe is the seller of record and the price shown is the total. Fourteen days to change your mind, no reason needed — you are not asked to waive that right.
Frequently asked questions
Do I really need Order Flow+?
Yes. The indicator reads bid and ask volume at every price level of every bar, from NinjaTrader’s volumetric API, which Order Flow+ enables; both calculation paths depend on it. A Lifetime NinjaTrader licence includes Order Flow+, and if it is not active a sentence on the chart says so.
Do I need Tick Replay?
No. Tick Replay is not required and switching it on does not change what you see. What you do need is historical tick data from your data provider, so the volumetric bars can be built — set “Days to load” high enough for the history you want.
When does the first box appear?
Once the chart holds at least 70 bars and a level has taken three touches, enough aggressive volume and a close back; Minimum touches of the level sets that count. Boxes are deliberately rare; the absorption lines and the dashed line at the recent high or low appear far more often, so a quiet session shows those first. If the chart type or Order Flow+ needs changing, a sentence on the chart says which.
Does it repaint?
A zone is written when its bar closes, and its price never moves afterwards. It extends to the right until a bar closes beyond it or 20 bars pass, and the chart keeps the 150 most recent zones. Its label can update, and the dashed line at the recent high or low is a running count, updated every bar.
Which settings decide where the boxes appear?
The 15. Level absorption settings: by default the boxes come from the level, not the score or grade. The score threshold, the forces-in-agreement and conflict limits, the grade thresholds, the minimum active forces and the relative-volume minimum drive the score, the info panel and the public series.
Can I read it from my own strategy?
Yes. Nine values are exposed as public NinjaScript series with unlimited lookback: the four force values, the aggregate score, the control direction, the stack count, and the boundaries of the last active buy and sell zone. Reference the indicator from your strategy and read them directly.
Can I see the raw numbers behind a zone?
Yes — that is Research mode. It writes a 67-column semicolon-separated CSV of every bar’s raw ingredients, including imbalances counted at three separate ratios, so you can rebuild the logic yourself in Excel or Python and test thresholds without touching NinjaTrader. One thing to know: the file is opened when the indicator loads its data, so switch the setting on and then reload the indicator; without the reload no file is written.
Lock the founder price
Every indicator, the copier and the Telegram agent, lifetime: $922.50 for the first thirteen founders, then $1,845 up to fifty. Your licence and portal account are created with the email address you pay with.